Checking In Guests
When a guest arrives at the property, the front desk user can check in the guest using the Check In menu. The Check In menu contains the Check In, Re-Check In, and Batch Check In options that can be used to check-in, recheck-in, and batch check-in guests. Users can also post booking charges to the group master folio using the Group Master Folio option.
Breakpoint: 55080 - Check In (Front Office - Reservation)
Perform the following steps to check-in the guests:
Navigate to Front Desk à Check In à Check In.

Search for the reservation using the confirmation number, guest name, room number, phone number, or OTA reference number.
Optionally, the user can also use the Advanced Search option to search for reservations using the reservation status, room number, arrival/departure date, booking ID, A/R account, room type, and building.
By default, only the reservations with arrival date same as the property date will be displayed in the search results. However, users can select the + <number of days> Days checkbox to view the future reservations. The number of days to be displayed must be configured in the Search Days to Display CheckIn, field present in the System Default screen (Settings à System Setup à Other System Switches / Defaults).
The Filter flag enable users to search for preferred records in the grid by entering or selecting values.
-
When enabled, a set of search fields (text fields and drop-down lists) appear next to the grid header. Users can enter preferred values in the text fields and select options from the drop-down lists to view the corresponding records. For example, to search for all reservations with a specific room number assigned, the user can select that room number from the Room Number drop-down list.
-
When disabled, the search fields will not be displayed in the grid. By default, this flag will be disabled.
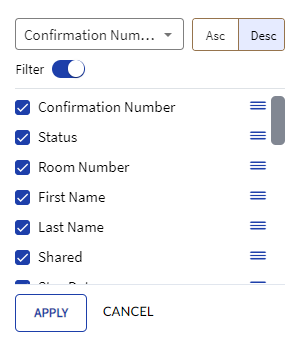
By clicking the Configure option, it enables users to select the columns that must be displayed or hidden from the grid. By default, all columns will be displayed. Other functionalities for this option include the following:
-
The user can choose whether the records in the grid must be arranged in ascending or descending order.
-
Asc - The records in the grid will be displayed in ascending order. By default, the Asc option will be selected.
-
Desc - The records in the grid will be displayed in descending order.
-
-
The user can enable the Filter flag to view the search fields in the grid.
-
The user can drag and drop and arrange the columns in the same order in which they must be displayed in the grid.
Click the Check In icon against the reservation record.
If a message is left for the guest in the property, the Guest Message screen will be displayed and the user can update or close the message after delivering it to the guest.
Click Check In.
If the room is not assigned for the reservation, the Assign Room number screen is displayed. The user can then assign the room and click Next to navigate to the Credit Card Interface screen.
Refer to the following table and fill in the fields:
|
Field |
Description |
|---|---|
|
Payment |
Select the payment method preferred by the guest. |
|
Confirmation Number |
The confirmation number of the reservation. |
|
Card Type |
Select the preferred type of card for the payment. The available options are Credit or Debit. |
|
Deposit Due |
Displays the deposit amount applicable for the reservation. |
|
Authorization Amount |
The maximum amount that the guest can pay with the selected payment method during the stay. |
|
Device |
Select the preferred device from the list of available devices to make the payment. |
Click Request Card.
If the guest credit card is due to expire within ten days from the departure date of the reservation, users will be alerted with the following message: The guest's credit card is due for expiry on MM/YY. Do you want to proceed?. Users can click Yes to proceed with credit card authorization and check in or click No to enter details of a new credit card before proceeding with the check-in process.
The selected device (in the Device field) must be active and available for users to connect to complete the payment.
Click Connect.
Click Process. The payment is processed successfully.
Click Check In.
Refer to the following table and fill in the fields in Check In Complete screen:
|
Field |
Description |
|---|---|
|
Request Keys |
The number of keys requested by the guest. |
|
Print GST Card |
The number of guest cards to be printed. |
|
Number of Garage Access Cards Needed |
The number of garage access cards requested by the guest. |
Click Extension to assign an extension number to the room.
Click Continue. The guest is checked in successfully.
Users can also authorize amount for credit card payments and check-in guests at the same time using the Authorize Card & Check In button. This is applicable only when users have selected the Credit Card payment method for the reservation.